
Learning how to propagate snake plants from leaf cuttings is one of my favorite ways to multiply these gorgeous plants without spending a dime. I’ve been growing snake plants (Sansevieria) for years here in Florida, and I’m always amazed at how easy it is to create new plants from just a single leaf. These tough, architectural beauties are perfect for beginners because they’re incredibly forgiving, and propagating them is almost foolproof once you know the basics. How to Propagate Snake Plants From Leaf Cuttings is a popular choice for gardeners.
Snake plants are some of the most rewarding houseplants to propagate because they’re so resilient. I remember my first attempt at leaf propagation – I was nervous I’d mess it up, but these plants are practically designed to survive and multiply. The best part? You can turn one healthy leaf into multiple new plants, which means more snake plants for your home or plenty to share with friends and family.
Getting Started with Snake Plant Leaf Cutting Propagation
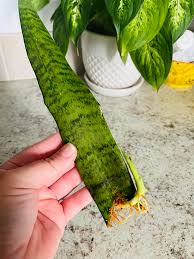
The first step in how to propagate snake plants from leaf cuttings is selecting the right leaf. I always choose a mature, healthy leaf that’s at least 4-6 inches long. Look for leaves that are thick, firm, and free from any damage or yellowing. The bigger the leaf, the more energy it has stored to create new plants.
Here’s something I learned the hard way – you need to cut the leaf properly! Use clean, sharp scissors or a knife (I always wipe mine with rubbing alcohol first) and make a clean cut across the leaf. The direction of the cut matters too. I cut my leaves into 3-4 inch sections, and here’s the key part – I make a small notch or mark on the bottom of each cutting so I know which end was closest to the soil.
Why does direction matter? Snake plant cuttings will only root from the end that was originally pointing toward the base of the plant. If you plant them upside down, they won’t root at all. Trust me, I’ve made this mistake and waited months wondering why nothing was happening! Now I always mark my cuttings or keep them in the same orientation when I cut them.
Let your cuttings dry for 2-3 days before planting. This step, called callusing, helps prevent rot. I just lay them on a paper towel in a spot with indirect light. Here in Florida’s humidity, they usually callus perfectly in about 2 days.
Best Methods for Propagating Snake Plant Cuttings
Also read: How to Grow Basil Indoors
You have two main options when learning how to propagate snake plants from leaf cuttings – water propagation or soil propagation. I’ve tried both methods extensively, and each has its advantages.
Water propagation is super satisfying because you can watch the roots develop. I place my callused cuttings in a glass jar with about an inch of water, making sure only the bottom of the cutting touches the water. Change the water every few days to keep it fresh. In Florida’s warm climate, I usually see roots starting in 3-4 weeks. The downside? Plants grown in water sometimes struggle when you transplant them to soil.
Soil propagation is my preferred method because it creates stronger, more adaptable plants. I use a well-draining potting mix – usually a combination of regular potting soil with some perlite or sand mixed in. Snake plants hate soggy soil, so good drainage is essential. I plant the cuttings about an inch deep, making sure the bottom (marked) end is in the soil.
Here’s a Florida-specific tip – our humidity can sometimes cause problems with fungal issues, so I’m extra careful about not overwatering. I water very lightly when I first plant the cuttings, then wait until the soil is completely dry before watering again. In our climate, this might be every 10-14 days.
Temperature matters too. Snake plants love warmth, and here in Florida, room temperature is perfect year-round. If you’re in a cooler climate, try to keep your cuttings somewhere consistently warm, around 70-80°F.
Caring for Your Snake Plant Leaf Cuttings
Once you’ve planted your snake plant leaf cuttings, patience becomes your best friend. I know it’s tempting to check for progress every day, but these plants work on their own timeline. Root development typically takes 4-8 weeks, and you might not see new growth shoots for 2-3 months or even longer.
The biggest mistake I see people make is overwatering their cuttings. Snake plants are succulents, which means they store water in their leaves and prefer to dry out between waterings. I use the “stick your finger in the soil” test – if it’s dry an inch down, it’s time for a light watering. In Florida’s heat, I might water every 10 days in summer, but much less in winter.
Light requirements are pretty forgiving. I keep my propagating cuttings in bright, indirect light. A spot near a window but not in direct sun works perfectly. Too much direct sunlight can stress the cuttings, while too little light slows down root development. I’ve had great success with cuttings on my covered porch where they get plenty of bright light but no harsh afternoon sun.
Don’t be surprised if some cuttings take longer than others or if a few don’t make it. Even with perfect care, propagation isn’t 100% successful. I usually start with several cuttings from the same leaf to increase my chances of success. The good news is that snake plants are incredibly resilient, so your success rate will likely be quite high.
Troubleshooting Common Propagation Problems
Even though snake plants are generally easy to propagate, I’ve encountered a few common issues over the years. The most frequent problem is rot, which usually shows up as mushy, black, or smelly cuttings. This almost always happens because of too much moisture or poor air circulation.
If you notice rot starting, don’t panic! Cut away the rotted portion with clean scissors, let the cutting dry and callus again for a day or two, then replant in fresh, dry soil. I’ve saved many cuttings this way. Prevention is better though – make sure your soil drains well and don’t water too frequently.
Another issue I sometimes see is cuttings that root but never produce new shoots. This can happen if the cutting doesn’t have enough energy stored or if growing conditions aren’t quite right. Be patient – I’ve had cuttings that took six months or more to show new growth. As long as the cutting stays firm and healthy-looking, keep caring for it.
Sometimes people ask me why their cuttings aren’t growing even after several months. University extension services note that snake plants naturally grow slowly, and propagated plants can take even longer to establish. Don’t give up too quickly!
Here in Florida, I occasionally deal with fungal issues due to our high humidity. If you notice any fuzzy growth on your soil or cuttings, increase air circulation and reduce watering. A small fan nearby can help, or try moving your cuttings to a less humid location.
Remember, every cutting is different, and success rates can vary based on the season, the parent plant’s health, and environmental conditions. I’ve learned to start more cuttings than I actually need because some inevitably don’t make it, and that’s completely normal.
Learning how to propagate snake plants from leaf cuttings has brought me so much joy over the years. There’s something magical about watching a single leaf transform into a whole new plant. I love giving propagated snake plants as gifts because they’re practically indestructible and bring such great energy to any space. Don’t get discouraged if your first attempts don’t go perfectly – I’ve been doing this for years and still learn something new with each batch of cuttings. The key is to start with healthy parent plants, be patient with the process, and enjoy watching your plant family grow!
