
If you’re dealing with how to fix common Alocasia problems like drooping leaves, root rot, and the one leaf club, you’re definitely not alone! I’ve been there with my own Alocasias, and trust me, these gorgeous plants can be a bit dramatic when they’re unhappy. The good news is that most Alocasia issues are totally fixable once you know what to look for. How to Fix Common Alocasia Problems: Drooping Leaves, Root Rot, and the One Leaf Club is a popular choice for gardeners.
These stunning plants, also called elephant ears, are absolutely worth the effort. Their huge, glossy leaves make such a statement in any room, and here in Florida, I love how they bring that tropical vibe indoors. Once you understand their needs and learn to spot the warning signs, you’ll be able to keep your Alocasia thriving year-round.
Understanding Alocasia Drooping Leaves and Quick Fixes
Drooping leaves are probably the most common complaint I hear about Alocasias, and honestly, it used to drive me crazy too! The main culprits are usually watering issues, lighting problems, or sudden environmental changes. I’ve learned that these plants are basically telling you exactly what’s wrong if you know how to read the signs.
Overwatering is the biggest cause of droopy Alocasia leaves. I use the finger test – stick your finger about 2 inches into the soil, and if it’s still wet, hold off on watering. These plants like their soil to dry out a bit between waterings, especially during our cooler months here in Florida. When the soil stays too soggy, the roots can’t breathe properly, and the leaves start to droop as a cry for help.
Underwatering can also cause drooping, but the leaves usually feel crispy or thin rather than soft and mushy. If your soil is bone dry and pulling away from the pot edges, give it a good drink and watch for improvement within a day or two. The leaves should perk up pretty quickly once they get the moisture they need.
Lighting issues are another major factor. Alocasias love bright, indirect light, but direct sun will scorch those beautiful leaves. I keep mine near a north-facing window or use a sheer curtain to filter harsh afternoon sun. If your plant is in a dark corner, try moving it closer to a window and see if the drooping improves.
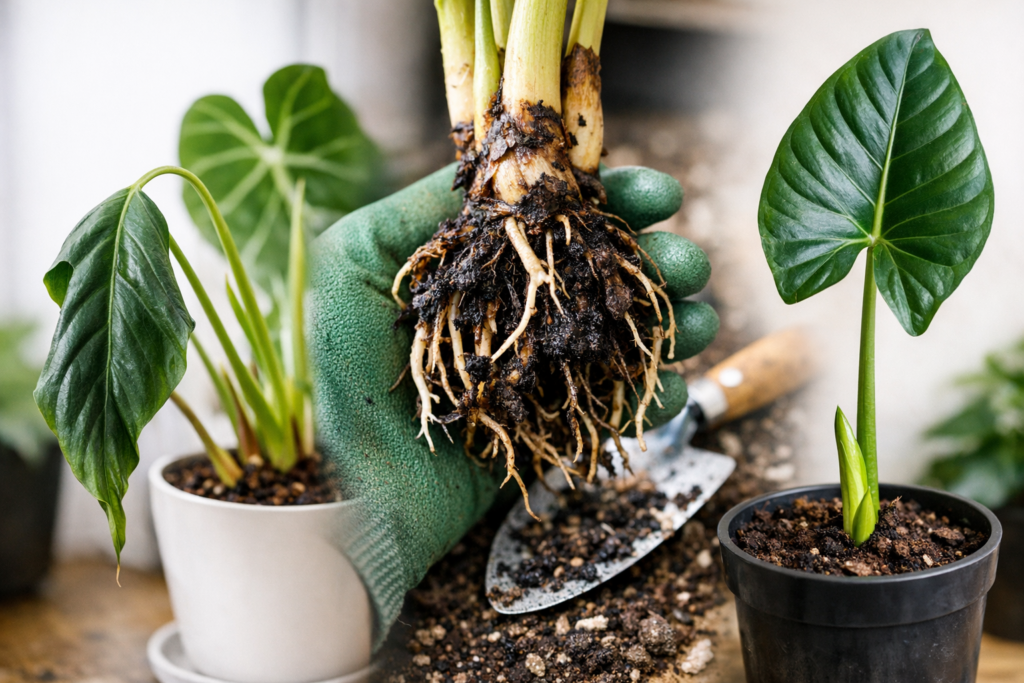
Preventing and Treating Root Rot in Alocasia Plants
Related article: How to Grow Ground Cherries (physalis Pruinosa): Complete Guide to Planting, Care, and Harvest
Root rot is honestly one of the scariest Alocasia problems because it can kill your plant fast if you don’t catch it early. I learned this the hard way with my first Alocasia Polly – I was so worried about it drying out that I kept the soil constantly wet. Big mistake!
The telltale signs of root rot include mushy, black roots, a funky smell when you check the soil, and leaves that turn yellow and drop off rapidly. If you suspect root rot, you need to act quickly. Carefully remove the plant from its pot and inspect the roots. Healthy roots should be white or light tan and firm to the touch.
If you find mushy, dark roots, don’t panic – you can often save the plant! Trim away all the rotted roots with clean, sharp scissors. I always sterilize my tools with rubbing alcohol between cuts to prevent spreading any fungal issues. Rinse the remaining healthy roots gently under lukewarm water.
Repot your Alocasia in fresh, well-draining potting mix. I like to add some perlite or orchid bark to regular potting soil to improve drainage. Make sure your new pot has drainage holes – this is absolutely critical for preventing future root rot issues. Water sparingly until you see new growth, which tells you the roots are recovering.
Solving the One Leaf Club Problem
The “one leaf club” is what we call it when your Alocasia keeps producing just one leaf at a time instead of the full, bushy plant you’re hoping for. I’ve been a member of this frustrating club more times than I care to admit! Usually, this happens because the plant isn’t getting enough energy to support multiple leaves.
Light is often the biggest factor here. Alocasias need bright, indirect light to photosynthesize efficiently and produce multiple leaves. If your plant is struggling along with just one leaf in a dim corner, try moving it to a brighter spot. I’ve seen dramatic improvements in leaf production just from better lighting.
Nutrition plays a huge role too. During the growing season (spring and summer), I feed my Alocasias monthly with a balanced liquid fertilizer diluted to half strength. University extension guides recommend this approach because it provides steady nutrition without overwhelming the plant.
Sometimes the one leaf club happens because your plant is putting all its energy into developing a strong root system. This is actually a good thing, even though it’s frustrating to watch! Be patient and maintain consistent care. Once the roots are established, you should start seeing more leaves emerging from the base.
Creating the Perfect Growing Environment
Getting your Alocasia’s environment right is the key to preventing most of these common problems. These plants are native to tropical regions, so they love warmth, humidity, and consistent conditions. Here in Florida, the humidity helps, but indoors can still be challenging.
Temperature consistency is super important. Alocasias prefer temperatures between 65-80°F and really don’t like sudden changes. I learned this when I moved one of mine from a warm living room to a cooler bedroom – it immediately dropped two leaves in protest! Keep them away from air conditioning vents, heaters, and drafty windows.
Humidity is another big factor. These plants thrive in 50-70% humidity, which can be tough to maintain indoors. I use a humidifier near my plant collection, but you can also group plants together or use a pebble tray filled with water. Just don’t mist the leaves directly – this can lead to fungal issues, especially in our humid Florida climate.
The right potting mix makes all the difference too. I use a mixture of regular potting soil, perlite, and a bit of orchid bark for drainage. The soil should hold some moisture but never stay soggy. Missouri Botanical Garden recommends well-draining, organic-rich soil for optimal growth.
Don’t forget about seasonal changes! Alocasias naturally slow down in fall and winter, so reduce watering and stop fertilizing during these months. Many people panic when their plant goes dormant, but it’s completely normal. Just keep the soil barely moist and wait for spring growth to resume.
Learning how to fix common Alocasia problems like drooping leaves, root rot, and the one leaf club takes some practice, but it’s so worth it when you see your plant thriving. Remember that these plants are naturally dramatic and will let you know when something’s wrong, which actually makes them easier to care for once you learn their language.
Be patient with yourself and your plant – I’ve killed my share of Alocasias while learning, and that’s totally normal! The key is paying attention to what your plant is telling you and making adjustments as needed. With consistent care and the right environment, you’ll have gorgeous, multi-leaf Alocasias that will be the envy of all your plant-loving friends.
