
Creating a DIY pea gravel pathway with stone edging has been one of my favorite weekend projects here in Florida. I’ve built three of these pathways in my own garden over the years, and they’re absolutely perfect for our climate. The combination looks elegant, drains beautifully during our heavy summer rains, and requires way less maintenance than traditional walkways. Diy Pea Gravel Pathway with Stone Edging is a popular choice for gardeners.
What I love most about pea gravel pathways is how they handle Florida’s weather extremes. Unlike concrete that can crack in the heat or wooden walkways that rot in humidity, gravel stays put and actually improves with age. The stone edging keeps everything neat and prevents the gravel from wandering into your flower beds.
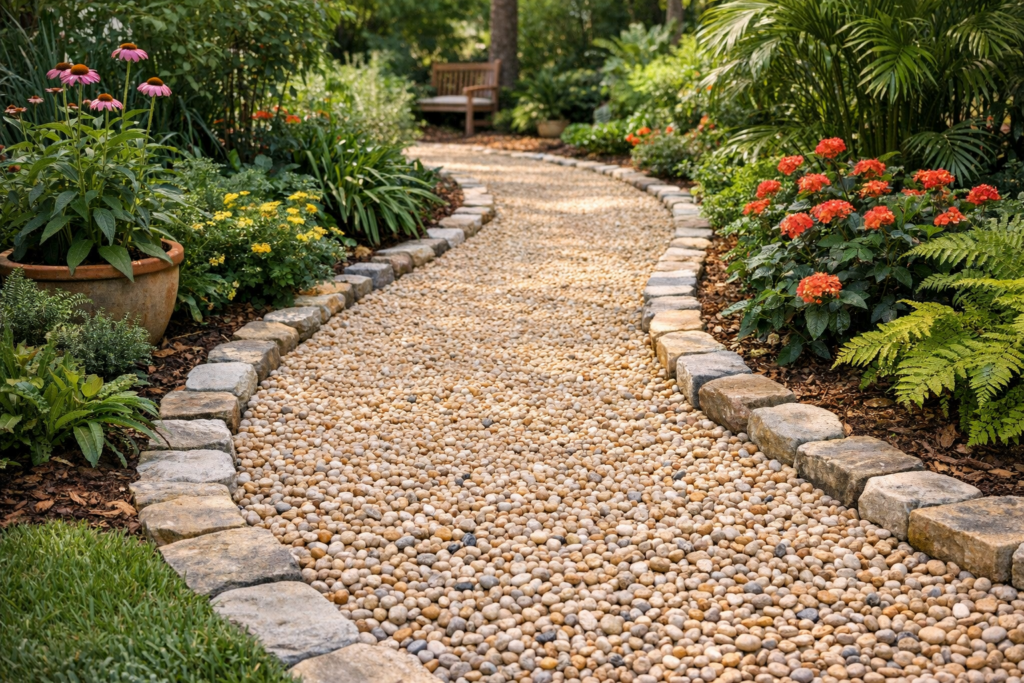
Planning Your DIY Pea Gravel Pathway with Stone Edging
Before you start digging, I always tell people to walk their intended path for a few days. You want to make sure it flows naturally and connects the right areas of your garden. I learned this the hard way when I built my first pathway too narrow and had to redo sections later.
The ideal width for a main pathway is about 4 feet, which gives two people room to walk side by side comfortably. For smaller garden paths, 3 feet works perfectly. Mark your pathway with spray paint or a garden hose so you can visualize the final result.
In Florida, I always check for underground sprinkler lines before digging. Trust me, hitting a sprinkler head with a shovel is not fun! Call 811 for free utility marking if you’re unsure about what’s buried in your yard.
Consider the drainage patterns in your yard too. Pea gravel pathways actually help with drainage, but you don’t want to create a river during heavy rains. I usually add a slight crown to the center of wider paths so water flows gently to the sides.
Essential Materials for Your Pea Gravel Pathway Project
You might also enjoy: Build a Cedar Raised Garden Bed
For the stone edging, I prefer using natural fieldstone or concrete pavers because they hold up beautifully in Florida’s heat and humidity. You’ll need enough stones to line both sides of your pathway, plus about 10% extra for breakage and future repairs.
The pea gravel itself comes in different colors and sizes. I usually go with 3/8-inch pea gravel because it’s comfortable to walk on and stays in place better than larger sizes. For a 50-foot pathway that’s 4 feet wide, you’ll need about 3-4 cubic yards of gravel.
Don’t forget the base materials, which are super important in Florida’s sandy soil. You’ll need landscape fabric, crushed stone or road base for the foundation, and sand for leveling the edging stones. I also keep extra gravel on hand because it settles more in our loose soil than in other climates.
A plate compactor makes this job so much easier, and most tool rental places have them. If you’re doing a smaller pathway, a hand tamper works fine, but your back will thank you for renting the compactor on longer projects.
Step-by-Step Installation of Pea Gravel Pathway with Stone Edging
Start by excavating your pathway to about 4-5 inches deep. In Florida’s sandy soil, I sometimes go a bit deeper because our soil shifts more than clay-based soils up north. Remove all grass, roots, and debris, and make sure the bottom is relatively level.
Lay down your landscape fabric next, overlapping seams by at least 6 inches. This prevents weeds from growing through while still allowing water to drain. I use heavy-duty fabric because Florida’s aggressive weeds will push through cheaper versions.
Install your stone edging first, before adding any gravel. Dig a trench along each side of the pathway, deep enough so about half of each stone sits below ground level. Use sand to level and adjust each stone, and make sure they’re stable before moving on.
Add 2-3 inches of crushed stone base and compact it thoroughly. This step is really important in Florida because our frequent rains can wash away poorly prepared bases. Then add your pea gravel in thin layers, raking and compacting as you go.
Maintaining Your Beautiful Garden Pathway
The best part about pea gravel pathways is how little maintenance they need! I rake mine about once a month to keep the surface even and remove any leaves or debris. In Florida, this also helps prevent fire ants from setting up shop in undisturbed areas.
After heavy rains, you might need to add a bit more gravel where it’s settled or washed away. I keep a small bag on hand for touch-ups throughout the year. The stone edging should stay put, but occasionally you’ll need to reset a stone that’s shifted.
Weed control is pretty minimal with good landscape fabric, but I do spot-treat any persistent weeds that pop up. A natural vinegar solution works great, or you can just pull them by hand when the soil is soft after rain.
The University of Florida Extension has great resources on landscape maintenance that I reference regularly. Winter is actually the perfect time to refresh your pathway and add any needed materials.
Your DIY pea gravel pathway with stone edging will give you years of beautiful, low-maintenance garden access. I’m still amazed at how much these pathways transform a garden’s whole feel and functionality. The project might take a weekend, but you’ll enjoy the results every single day you walk through your garden!
