
Air layering houseplants is one of my favorite ways to propagate rubber trees, ficus, and other woody houseplants because it’s practically foolproof. Unlike stem cuttings that sometimes fail to root, air layering lets you grow new roots while the branch is still attached to the parent plant. I discovered this technique when my rubber tree got too tall for my living room, and now I use it all the time to create new plants for friends and family. Air Layering Houseplants: How to Propagate Rubber Trees, Ficus, and Other Woody Houseplants is a popular choice for gardeners.
This method works beautifully for plants with thick, woody stems that don’t root easily from regular cuttings. You’re basically creating a little nursery right on the branch itself. The best part is you can see exactly when roots develop, so there’s no guessing involved!
What Makes Air Layering Perfect for Rubber Trees and Ficus
Rubber trees and ficus plants are ideal candidates for air layering because they have that sturdy, woody stem structure that responds well to this technique. I’ve had amazing success with my rubber tree (Ficus elastica), fiddle leaf fig, and even my weeping fig using this method. These plants naturally produce aerial roots in their native tropical environments, so air layering just mimics what they’d do in the wild.
The thick stems on these plants hold moisture well, which is exactly what you need for successful root development. Plus, they’re not as finicky as some other houseplants when it comes to propagation. I love that you can create a full-sized plant instead of starting with tiny cuttings that take forever to grow.
In Florida’s humid climate, air layering works even better because our natural moisture helps keep everything from drying out too quickly. I’ve found that spring and early summer are the perfect times to try this technique here, when the plants are actively growing and the humidity is naturally higher.
Step-by-Step Guide to Air Layering Your Woody Houseplants
For more gardening tips, check out: How to Propagate Snake Plants From Leaf Cuttings
Start by choosing a healthy branch that’s about pencil-thick or larger, ideally 12-18 inches from the tip. I always pick a spot that’s below where I want the new plant to start, usually where there are already some leaves. Make two cuts around the branch about an inch apart, going through the bark but not so deep that you damage the inner wood.
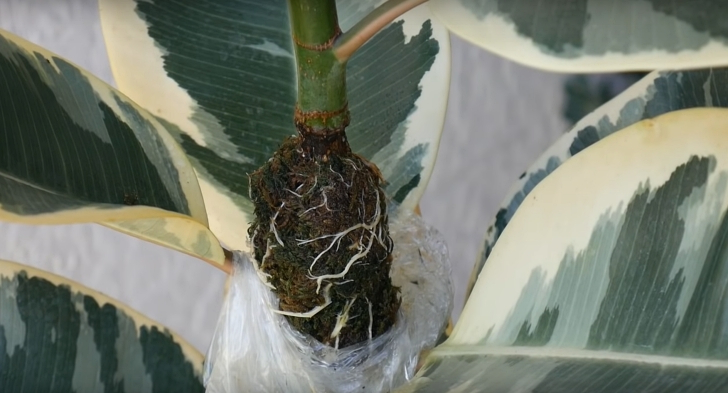
Carefully peel off the bark between your two cuts to expose the light-colored wood underneath. This is where the new roots will form, so don’t skip this step! I like to scrape gently with a clean knife to make sure I’ve removed all the bark in that ring.
Now comes the fun part – wrap the exposed area with damp sphagnum moss. I soak the moss first, then squeeze out excess water until it’s moist but not dripping. Pack it around the wound and secure it with plastic wrap, then tie both ends with twist ties or rubber bands to create a little greenhouse effect.
Caring for Your Air Layered Plants During Root Development
Check your air layering setup every week or two by gently feeling the moss through the plastic. It should stay consistently moist but never soggy – think of a wrung-out sponge. If it feels dry, carefully unwrap one end and add a little water with a spray bottle, then re-seal it.
You’ll start seeing white roots developing after about 4-8 weeks, depending on the plant and growing conditions. I get so excited when I first spot those little root nubs poking through the moss! Don’t rush to cut the branch yet though – wait until you have a good network of roots that are at least 2-3 inches long.
The parent plant needs normal care during this process, so keep watering and fertilizing as usual. I’ve noticed that plants sometimes put extra energy into root development, so don’t worry if growth seems to slow down a bit. Here in Florida, I make sure to keep air-layered plants out of direct afternoon sun, which can overheat the plastic wrapping.
Transplanting Your New Plants Successfully
Once you have strong roots, it’s time for the big moment – cutting your new plant free! Use clean, sharp pruning shears to cut just below the root ball. I always feel a little nervous doing this, but remember that both plants will be fine.
Plant your new baby immediately in a pot with good drainage, using a quality potting mix. I like to add some perlite for extra drainage since newly transplanted plants are sensitive to overwatering. Keep the soil consistently moist but not waterlogged for the first few weeks while the roots establish.
Place your new plant in bright, indirect light and avoid fertilizing for at least a month. The roots need time to settle into their new home without the stress of extra nutrients. I usually keep mine in a slightly more humid spot, like near my other houseplants, to help with the transition.
Your original plant will likely sprout new growth from below where you made the cut, often creating a bushier, more attractive shape. It’s like getting two plants for the price of one! I’ve found that rubber trees and ficus plants are particularly good at bouncing back and creating beautiful new growth after air layering.
Air layering houseplants might seem intimidating at first, but it’s honestly one of the most reliable propagation methods I know. The key is patience and keeping everything consistently moist without overdoing it. I love that you can create mature plants relatively quickly instead of waiting years for cuttings to grow up.
Give it a try with your rubber tree or ficus – I bet you’ll be amazed at how well it works! Once you see those first roots developing, you’ll be hooked on this technique just like I am.
