
Learning how to propagate snake plants by division is one of my favorite ways to multiply these gorgeous houseplants without spending a dime. I’ve been doing this for years here in Florida, and it’s honestly foolproof once you know the basics. Snake plants naturally produce little baby plants called pups or offsets that grow right from the mother plant’s roots. How to Propagate Snake Plants by Division is a popular choice for gardeners.
The best part about division is that you get instant gratification. Unlike leaf cuttings that take months to develop roots, divided snake plants are already established and ready to grow. I usually end up with three or four new plants from just one mature snake plant!
When to Divide Your Snake Plant for Propagation
I always tell people that timing is everything when it comes to how to propagate snake plants by division. The absolute best time is during spring or early summer when the plant is actively growing. Here in Florida, I usually do my dividing in March or April when the weather starts warming up consistently.
Your snake plant will literally tell you when it’s ready to be divided. Look for those little baby plants popping up around the base of the mother plant. I get so excited when I see these because I know I’m about to get some free plants! The pups should be at least 3-4 inches tall with their own root system developing.
Don’t rush the process if the babies are still tiny. I learned this lesson the hard way when I tried dividing too early and lost a few pups. Wait until they’re substantial enough to survive on their own. You’ll know they’re ready when they feel sturdy and have that classic snake plant look, just in miniature.
Step-by-Step Snake Plant Division Process
For more gardening tips, check out: How to Propagate Succulents
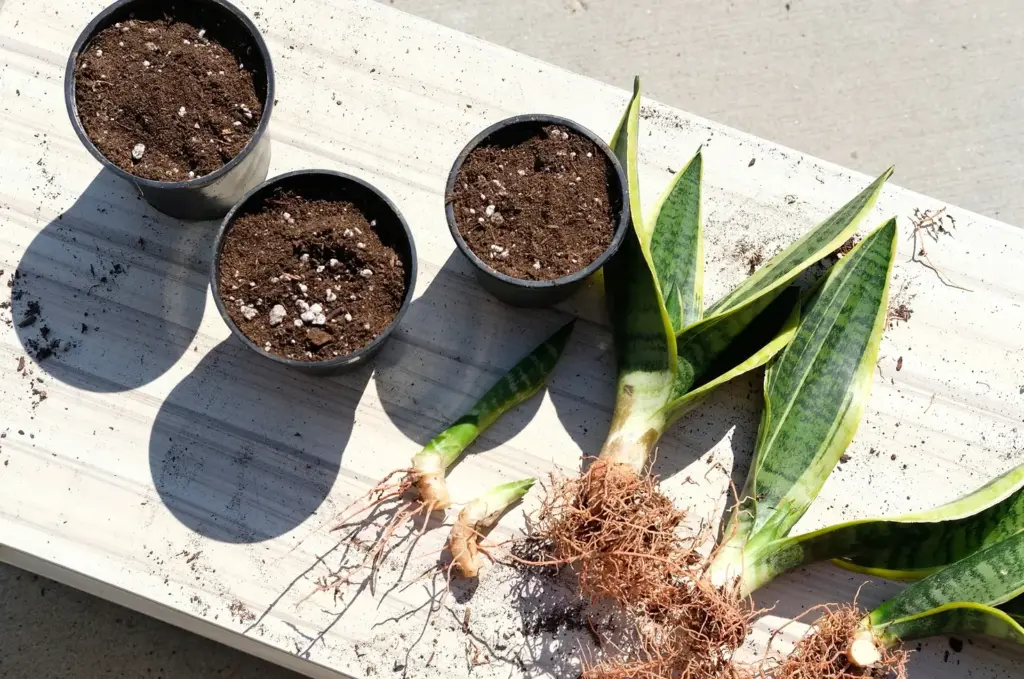
Before I start any snake plant propagation by division, I gather all my supplies. You’ll need a sharp, clean knife or pruning shears, fresh potting mix, new containers with drainage holes, and some rubbing alcohol for sterilizing. I always clean my tools first because snake plants can be susceptible to rot if bacteria gets into the cuts.
Carefully remove your snake plant from its pot and gently shake off the excess soil. This is where it gets fun because you can really see the root system and identify where each pup connects to the mother plant. The roots are usually white or light colored and surprisingly robust.
Look for natural separation points where the pups have their own root systems. I use my fingers to gently tease apart the roots first, then make clean cuts with my sterilized knife where needed. Each division should have both roots and at least one healthy shoot. Don’t worry if some roots break during the process – snake plants are incredibly forgiving.
Caring for Newly Divided Snake Plant Pups
After I’ve completed the division process, I let the cut surfaces dry for a few hours before potting. This might seem weird, but it actually prevents rot by allowing the wounds to callus over. I just set them on a clean towel in a shady spot while I prepare their new homes.
Plant each division in well-draining potting mix in containers that aren’t too large. I use pots that are only slightly bigger than the root system because snake plants actually prefer being a bit root-bound. University extension guides recommend using a cactus or succulent potting mix for best drainage.
Water very lightly after planting and then wait! This is the hardest part for me because I want to fuss over my new plants. But overwatering is the quickest way to kill a newly divided snake plant. I wait until the soil is completely dry before watering again, which usually takes about a week or two depending on humidity.
Common Mistakes and Troubleshooting Tips
The biggest mistake I see people make is watering too much after division. I get it – you want to help your new plants establish, but snake plants hate wet feet. I’ve killed more plants with kindness than neglect, trust me! Stick your finger into the soil, and if it feels even slightly damp, wait another few days.
Another common issue is using pots that are too big. I used to think bigger was better, but snake plants actually grow better when they’re slightly crowded. Research shows that oversized pots hold too much moisture and can lead to root rot.
Don’t panic if your newly divided plants look a little droopy for the first week or two. This is totally normal as they adjust to their new environment. Keep them in bright, indirect light and resist the urge to move them around. I’ve learned that patience really pays off with snake plant propagation.
If you notice any soft, mushy spots or foul smells, that’s a sign of rot. Remove the affected areas immediately with a clean knife and let the plant dry out completely. Sometimes I’ll even repot in completely fresh, dry soil if I catch rot early enough.
Learning how to propagate snake plants by division has given me so many beautiful plants over the years. I love sharing divisions with friends and family because there’s something special about giving someone a plant you’ve grown yourself. Start with a healthy, mature snake plant and don’t be afraid to experiment!
The whole process becomes second nature once you’ve done it a few times. Your snake plants will reward your efforts with years of gorgeous, low-maintenance greenery that you can enjoy and share with others.
